Are you the proud owner of the Sony A6000? In that case, it is useful to know what all the buttons are for. This article explains the meaning of all buttons that can be found on the Sony A6000. I do this based on different images on which numbers are displayed. I provide a brief explanation for each issue. The buttons of the Sony a6000:

1: Button for disconnecting the lens
When you press this button and rotate the lens away from the camera body, you can change lenses.
2: Diameter of the lens
Most lenses from Sony indicate on the front of the lens which diameter (in millimeters) the lens has. The diameter size is important when you want to buy filters for the lens. There are different types of camera filters that can make your photos even more beautiful.
3: Focus ring of the lens
By turning the rear and smallest lens element with the Sony 16-50 mm OSS, you can focus manually. It is important that the AF / MF slider (on the side of the lens) is set to MF. With lenses for Nikon, the focus ring is usually found behind the zoom ring and not entirely on the back of the lens.
4: Built-in microphone
Many SLRs can now film at high quality. It is, of course, nice if you also have audio with that. The internal microphone takes care of the audio recording. I have to say it’s not the best microphone, but you can connect wireless microphones with the camera through Bluetooth (there is no option for wired microphones).
5: Red-eye correction and self-timer lamp
This is a light that turns on when you flash when taking a picture. This reduces the chance of people having red eyes. This little light will also flash if you want to take a photo with the self-timer. You can tell from this light that the camera counts down until the photo is taken.
6: Shutter button
The most important button on your Sony a6000! With this one, you take the picture. When you press the button halfway, you activate the automatic focus. The focus points will become visible in the viewfinder and the camera will beep to confirm focus (unless you turned that sound off, like me).
7: Off / on button
Ok, this is, of course, also an important button! With this slider, you can turn the camera on or off.
8: C1 button
You can assign a personalized function to this button in the menu.
9: The flash
More about the flash in the next paragraph.
1: Built-in flash
Many SLRs have a built-in flash. If you do not have an external flash you can use this one, although the result of the internal flash is not always the best. When you shoot in automatic mode, the flash will automatically raise when it is a bit dark. If you’re shooting from the aperture-priority, shutter-priority or manual mode (one of these 3 modes is absolutely recommended), you must first press the flash button to activate the flash.
2: Hotshoe
The “hotshoe” gives the possibility to place an external flash on top of the camera. There are also wireless remote controls and triggers (for wireless flash) that you can place on the hotshoe.
3: Shutter button
This will take the picture. First press this button halfway for autofocus. If you see an autofocus point light up in the viewfinder (or you hear a beep), the camera has focused and you can press the button completely.
4: Adjustment wheel
When shooting from shutter priority (TV mode) or aperture priority (Av mode) mode, you can set the shutter speed or aperture. If you shoot from the manual mode (M mode), you need this adjustment wheel to adjust the shutter speed. By holding down the exposure compensation button (more about this button below) and turning the control dial, you adjust the aperture from M mode.
5: Program wheel
This allows you to select the desired photography mode. To have maximum control over the end result of a photo, it is recommended that you can shoot at least from the aperture-priority (Av) and shutter-priority (Tv). It is also useful to take photos from the manual mode (M). The automatic mode (green square) and the program mode (P) are not ideal to use. Your camera can do much better! From the automatic mode, the camera will make many decisions for you and these are often not optimal or even very bad.
Read more about the different modes of your Sony a6000 camera here.
6: On / off button
You use this button to switch your Sony a6000 on and off.

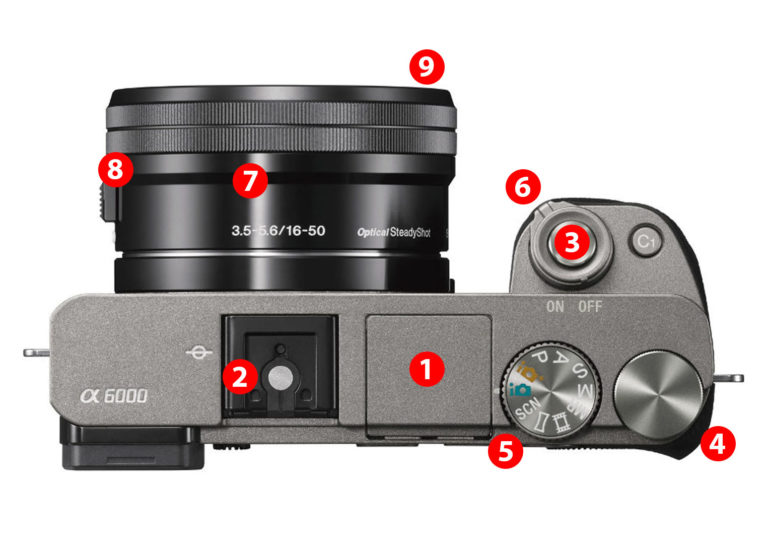
1: Camera Roll
With this button, you go to the camera roll. You will first see the last photo taken, but you can also view previously taken photos using the navigation buttons (see point 3) and even view the associated settings.
2: Main menu of the Sony a6000
Many settings of the Sony A6000 can be set via buttons on the camera body. However, there are also functions that you need less often. These are in the main menu.
3: Multi-selector
Use this switch to disable or select manual focus point selection. The turntable has several functions. By clicking on it you activate the focus points. By simply turning without applying pressure you can influence the shutter speed in the M, A, S, P mode.
4: Navigation keys
This allows you to navigate the camera’s menu. You can actually see it as “arrow keys” so you can navigate up, down, left and right. In addition, these buttons offer the possibility to adjust the ISO value, white balance, autofocus method (One-Shot for single autofocus, AI Servo for continuous autofocus, and AI Focus for automatic autofocus) and release mode (single photos, continuous recording, self-timer, etc.) to suit.
5: Display Menu
With this button, you can quickly reach the settings you need most during shooting, without having to dive into the main menu (number 2).
6: Trash
Delete photos you view through number 1.
7: Adjustment wheel
Via this wheel, you can quickly select settings and, depending on the program mode, check the shutter speed. The button has a multifunctional function when you combine it with other buttons.
8: Autofocus
You can choose the focus points via this button.
9: Tiltable screen
It is possible to tilt the touchscreen of the Sony A6000.
10: Activate flash
If you shoot from the Av, Tv or M mode, you can open the flash with this.
11: Exposure Compensation & Aperture / Shutter Speed.
When shooting in (M mode) manual mode, you can use this button to switch between changing the shutter speed or aperture mode. If you hold this button down, you can adjust either the shutter speed or the aperture value with the control wheel (4).
12: ISO
This button allows you to quickly adjust the ISO sensitivity during shooting.
13: Video
You can make a video recording via this button. Filming is also only possible when using the movie mode (see back). The image is then displayed on the screen.
14: Diopter adjustment control
Do you wear glasses? You can photograph without glasses via this turntable. Turn the regulator to the correct strength. Focus the camera on an object automatically. Do you see the subject clearly without glasses? Then you have set it correctly!
15: Release Mode
With this button, you determine what happens when the shutter is released. You can choose from a single image, continuous, silent release, remote control, or self-timer.